


Building Online Store With WordPress
6 Steps To Building An Online Store Using WordPress
- Sign Up For Bluehost If You Have Not Yet – Click Here To Sign Up
- Set up your WordPress
- Pick a theme that has a page builder and WooCommerce
- Configure WooCommerce
- Customize Your Theme
- Do a test order & celebrate yourself
Signing Up For Bluehost
Before we get started on building an online store with WordPress, we first need a place to host an online store built on WordPress, and that place can be Bluehost.com.
Once you arrive at Bluehost scroll down where you will see 3 plans:
- Shared Hosting ( Good for blogs ) ( $3.95 /M )
- Online Stores ( We will be using this plan for this guide) ( $29.95 /M )
- Managed WordPress ( For high traffic websites, you can upgrade to this or start with this ) ( $29.95 /M )
Go ahead and click the “learn more” button on the middle plan (Online Stores), then click the “Start Your Store” button.
After doing that follow the steps below to successfully sign up:
- Select a payment plan ( 1 month, 12 months, 36 months).
- Click the “Select” button on the “Standard” option.
- Enter your domain name if you have one or create a new one
- Enter your personal and payment information and click the “submit” button.
- Now you should see a create account button, go ahead and click that, and set up your domain and password for your Bluehost account, then go to login and use the credentials you have just created.
- After you log in, Bluehost should take you through a “Create Your Website Process”. Follow along until the end.
- Now that you have completed the process go to Bluehost and login to your website using your credentials.
- Once logged in click on “My Sites” on the top left panel of your Bluehost admin, and click login to WordPress.
Here is a video that will guide you in case you prefer to watch vs reading:
Sign Up For Bluehost
Set Up Your WordPress
Now that you have successfully signed up for Bluehost, and you were able to login into your WordPress Admin Panel we can go ahead and set up some basic WordPress settings.
Below you can find a list of must configure WordPress settings to ensure that you don’t run into any issues in the future:
- General Settings
- Permalink Settings
- Reading Settings
- Navigation
Follow the instructions below to successfully set up these settings:
- General: On the left panel of your WordPress admin click “Settings” -> “General”. After doing so fill out the Site Title and Tagline fields, double-check that the administration email is your email, and set up your time zone, and user registration settings. After you’re done click save at the bottom of the page.
- Permalink: On the left panel of your WordPress admin click “Settings” -> “Permalink”. After doing so, go ahead and choose the “Post Name” option under the Common Settings section. After you’re done click save at the bottom of the page.
- Reading: On the left panel of your WordPress admin click “Settings” -> “Reading”. After doing so, go ahead and check the checkbox “Discourage search engines from indexing this site”, this will prevent search engine like google from going through your website. Do not forget to turn this OFF by unchecking the checkbox when you’re ready to receive visitors. Click save at the bottom of the page and you should be done.
- Navigation: On the left panel of your WordPress admin, click on Appearance -> Menu . Here you can edit/create new navigation items, when you are done editing or creating a navigation click save and visit your home page to see your changes live.
Pick A Theme With A Page Builder and WooCommerce
Here Are 5 Things To Consider When Searching For A WordPress Theme
- Make sure that the theme contains nice and clean design elements that reflect the store you have in mind.
- Make sure that the theme you choose comes with demo content.
- Make sure that the theme of choice has good reviews and is mobile responsive.
- Make sure that the theme you choose comes with a page builder such as elementor.
- Make sure that the theme is easy to use and configure.
Finding & Installing a WordPress Theme From The WordPress Theme Store:
If you have no yet picked a theme with a page builder such as Astra via the Bluehost “Create Your Website Process” mentioned in the Signing up for Bluehost section above, you can find a theme to build your online store on WordPress by following the steps below:
- On your WordPress admin panel go click on “Appearance” -> “Themes”. After doing so click on the “Add New” and searching for the keyword “Elementor” on the search bar to the top right of the screen.
- After doing so you should see results of themes that are built with Elementor page builder, this will allow you to drag and drop elements so you don’t have to do any coding.
- Once you find them you click simply click “Install” and then “Activate”.
Finding & Installing a WordPress Theme From ThemeForest MarketPlace:
A great alternative to the WordPress Theme Store would be ThemeForest, Theme Forest has thousands of ready to go WordPress online store themes.
Click Here to view a list of Elementor ready online store themes.
After you found and purchased a theme from ThemeForest follow the steps below to install the theme you have purchased:
- While logged in to ThemeForest hover over your username on the top right of the screen and click on “downloads”.
- Click the green download button next to the theme of choice and choose the “All Files and Documentation”.
- Extract the zip file by double-clicking on it or right-click and choose “extract”.
- Go to your WordPress admin panel and click on “Appearance” -> “Themes”.
- Now Click “Add New” -> “Upload Theme” -> Choose File and choose the zip file with the name of your theme.
- Click “Install”, then click “activate” once it’s done installing.
- On the zip file you extracted go ahead and find your theme’s documentation and follow along to successfully install and import the demo data of your them, please remember to remove all demo data you did not use to prevent looking like a spam site to google and other search engines.
Configure WooCommerce Plugin For WordPress
Now that your theme is all set up and you have your demo data let’s go ahead and follow the steps below to configure our WooCommerce WordPress Plugin.
- On your WordPress admin panel go to “WooCommerce” -> “Settings”, if you do not have WooCommerce Installed yet, from your WordPress admin panel please go ahead and install it by going to “Plugins” -> “Add New”, Search for WooCommerce on the search box and click install and activate.
- Configure your Store Address & Currency Option under the general tab, feel free to use your home address or business address if you have one then click save.
- Configure your Product Settings by clicking on the Product Tab, when finished click save.
- Configure your Shipping settings by clicking on the Shipping Tab, when finished click save.
- Configure your Payment settings by clicking on the Payment Tab.Keep in mind you will need a payment processor in order to receive payments such as Stripe, PayPal, and Authorize.net.You can find the stripe and authorize.net woo-commerce plugins by going to “Plugins” -> “Add New” from your admin panel and searching for either “stripe” or “authorize.net” and you can install the plugin of choice by clicking install and active from the plugin store.
- Configure your Accounts & Privacy settings by clicking on the Accounts & Privacy tab.
- Configure your E-mail settings by clicking on the E-mail tab.
- Integrations, Advanced, and Multi Order tab are not required to configure, leave as it is.
Add Products & Customize Your Theme
To add products to your WooCommerce store follow the simple steps below:
- From your admin panel navigate to “Products” -> “Add New”
- Set your product name by filling in the product name field.
- On the mid-right of the screen click Set Product Image to add product images.
- Scroll down to the product data section and fill in the fields, below is a screenshot of the product data section:
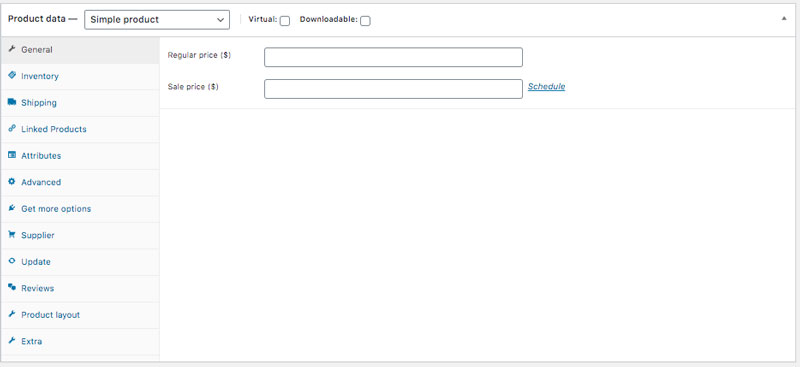
- After you are done filling out the fields, simply click on publish to make your product live.
How To Customize Your Online Store With Elementor
Now that you finished setting up your WooCommerce, you are ready to start customizing your online store.
To add new pages with your drag and drop builder simply from your admin panel click on “Pages” –> “Add New”, this will bring you to a screen to edit your page, scroll down and click “Edit With Elementor”.
This will bring you to your page editor, on the left side you will find all the elements you can drag and drop and edit onto the page.
We recommend you take a few minutes and familiarize yourself with this page builder as you will be using it a lot from onward.
After you have finished editing the page, click the save button in the bottom left of your editor screen.
To add new pages simply repeat this step and to edit the current page simply go to “Pages” -> “All Pages” and click Edit next to the page you desire to edit.
Do A test Order And Celebrate Yourself
Congratulations! Your store should now be all set up and ready to make you consistent residual income.
Place a test order, and if everything goes well you are done!